When a Brick Fireplace Damper No Longer Seals Properly

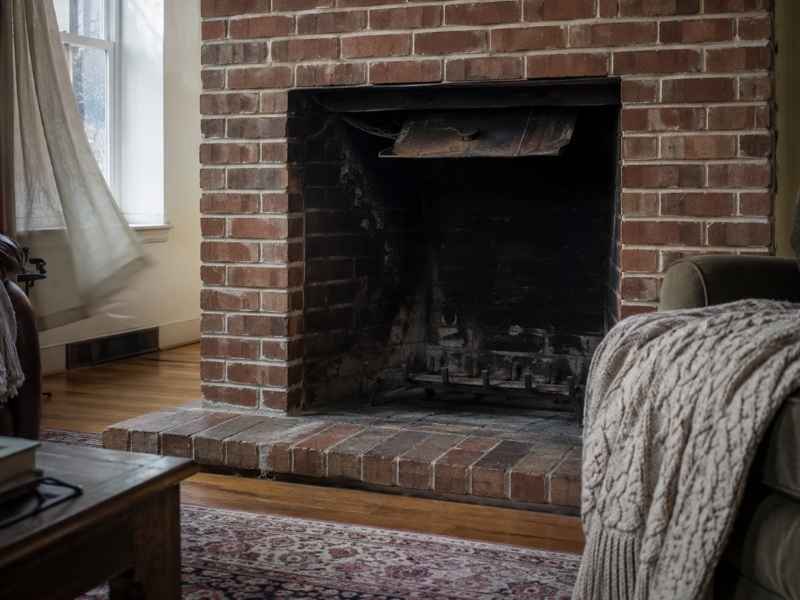
Older brick fireplace with a partially open metal damper in a Fort Worth home

A brick fireplace can look solid and still let air slip through when it sits unused. The part doing the sealing is the damper, a metal plate up in the throat of the chimney. When it stops closing tight, you might feel cold air near the hearth on a chilly night or catch a faint chimney smell in the room.Winters bring sudden cold fronts, and a damper that no longer seals turns those temperature swings into a draft you can feel from the couch. The good news is that a failing damper leaves clues. 

Signs a Brick Fireplace Damper Is No Longer Sealing

The clearest sign of a bad seal is air moving when it shouldn’t. A damper that closes tight should block the chimney like a lid on a jar. When the seal fails, outside air slips past the plate and into your living space. You might notice a steady draft near the fireplace, a room that never quite warms up or a musty chimney smell on windy days.

These are the signs that point to a damper seal problem:

  • Cold air drifting from the fireplace when no fire is burning
  • A spot near the hearth that stays cooler than the rest of the house
  • A smoky or musty odor from the firebox, often stronger in damp weather
  • A whistling or fluttering sound as air squeezes past the plate
  • Heating and cooling bills that creep up without another clear cause

One of these alone might mean something minor. Several together usually point back to the damper, so the seal is the thing to check first.

How an Aging Damper Affects an Older Wood-Burning Fireplace

An older wood-burning fireplace puts its damper through years of heat, smoke and moisture, and the metal wears down. Most older fireplaces use a throat damper, a steel or cast iron plate that sits just above the firebox. Every fire heats that plate, and every cool-down lets it contract. After enough seasons, the metal can warp just enough that it no longer sits flat when closed.

Rust adds to the problem. Moisture drifts down the chimney and settles on the plate and hinge, and that rust roughens the edges where the damper should meet its frame. A pitted edge can’t form a clean seal. Years of soot and grit around the pivot make the plate catch or sit crooked.

Simple wear matters too. Opening and closing the damper hundreds of times loosens the hinge and bends the handle. Throat dampers rarely seal perfectly even when new, and age only widens those gaps. That’s why a fireplace that sealed fine years ago can feel drafty now.

Draft Problems Caused by Gaps Around the Damper

A gap of even a quarter inch around the damper can pull a surprising amount of air through the chimney. Warm air inside your home rises, and a chimney gives it a straight path up and out. When the damper won’t close all the way, that rising air escapes through the flue and drags cold outside air in to replace it. That’s why a leaky damper feels worse on cold, windy days.

The draft runs the other way in summer. Hot, damp Fort Worth air can slide down a gappy chimney and settle near the firebox, and that brings a musty smell into the room.

What makes this tricky is that the fireplace can look completely shut. The handle sits in the closed position and the plate looks down, yet air keeps moving. A seal that’s off by a small margin still leaves a real gap, and air always finds it. An open or leaky damper works like a window you forgot to close.

Checking Damper Movement Before Fireplace Use

You can learn a lot about a damper just by working it a few times with a flashlight in hand. Reach up into the throat, find the handle, and open the damper fully. It should swing open without grinding, sticking or dropping loose. A handle that flops, jams or needs a hard shove is telling you the mechanism is worn.

Next, close it and look at how the plate sits. With the fireplace cool and clean enough to see, shine the light up and check whether the plate rests flat against its frame all the way around. Daylight past the edges means the seal isn’t complete. A plate that sits crooked or wobbles when you nudge it points to warping or a bent hinge.

Do this only when the fireplace is cold and you haven’t burned anything for a while. These are simple looks, not repairs, and they help you decide whether the damper is fine or worth a closer inspection.

When a Damper Problem Calls for Professional Fireplace Evaluation

Some damper problems go past what a flashlight can settle. A plate that’s badly warped, an edge eaten by rust, a seized hinge or a handle that snapped off all call for a trained eye. A qualified chimney professional can judge whether the damper can still be sealed or whether the mechanism has reached the end of its life.

This matters more in an older wood-burning fireplace, where the damper has to fit an aging throat and flue. A pro checks how the plate meets its frame and whether corrosion has spread to parts you can’t see from below. When a throat damper can’t seal anymore, some older systems get a top-sealing damper at the chimney top, which closes with a rubber gasket for a much tighter fit.

The National Fire Protection Association standard, NFPA 211, recommends a professional inspection at least once a year, whether or not you use the fireplace much. A yearly check catches a failing damper before it grows into a bigger draft or moisture problem.

Frequently Asked Questions

Why won’t my brick fireplace damper close completely?

Age is usually behind it. The metal plate can warp after years of heating and cooling, while rust and soot around the edges and hinge keep it from seating flat. A bent handle or a worn hinge can also stop the plate from swinging fully shut. In older fireplaces, several of these often add up at once.

How can I tell if my fireplace damper is sealing properly?

Feel for air first. A cold draft near the hearth on a still, cold day, or a room that stays chilly no matter the thermostat, usually means the seal is leaking. A musty chimney smell in damp weather is another tip-off. You can also shine a flashlight at the closed plate and look for daylight around its edge.

Can a damaged damper cause drafts from an unused fireplace?

Yes, and it’s common. Even with no fire going, warm air in your home rises and slips out through any gap in the flue, and it pulls cold air in behind it. A damper that won’t close tight leaves exactly that gap. The draft can run downward too, so an unused fireplace can still feel like an open window.

Should an old fireplace damper be replaced or repaired?

The right move depends on the damper’s condition. A plate that’s just sticky or slightly out of line can often be cleaned, adjusted and resealed. One that’s heavily rusted, cracked or warped past sitting flat usually needs replacing. When a throat damper can’t hold a seal, some homeowners switch to a top-sealing damper for a tighter close.

Is it safe to use a wood-burning fireplace when the damper does not close properly?

A stuck damper is a bigger deal than a draft. If it won’t open fully, smoke and gases like carbon monoxide can back up into the room during a fire. Even a damper that opens fine but won’t seal points to worn parts a professional should check. Have the mechanism looked at before you keep burning.

Brick Masonry Around Commercial Sign Openings Needs Careful Patching

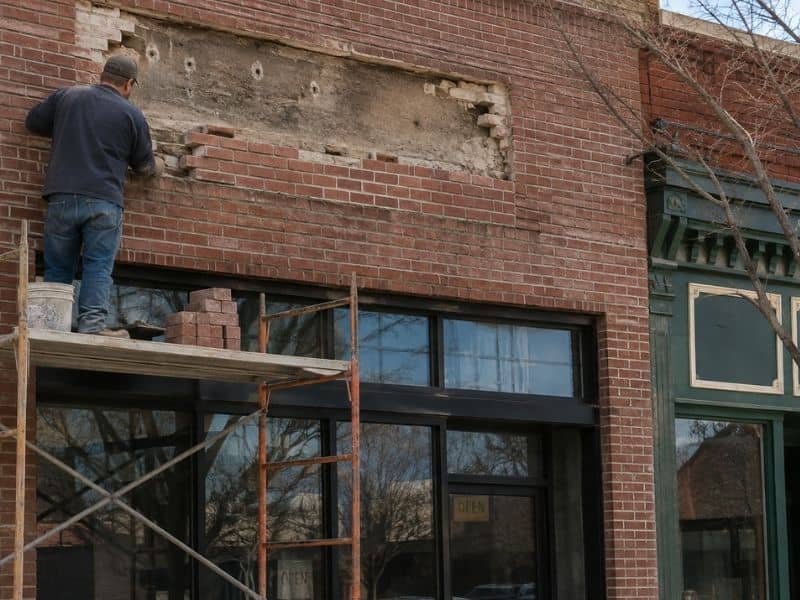
Brick masonry patching around a former commercial sign opening on an older Fort Worth retail building.

When an old storefront sign comes down, the wall behind it rarely looks clean. Brick masonry around that spot often shows holes, chipped edges or bare patches where the sign used to hang. It has plenty of older retail buildings with this exact problem, especially along its historic commercial streets. Patching one of these openings takes more care than most people expect. A rushed fix stands out, and it can even weaken the wall. 

Identifying Damage Left by Removed Commercial Signs

Crews bolt, screw or anchor signs straight into brick. When they pull those signs off, the fasteners tear out small chunks of the surface. You’ll often find rows of drilled holes, cracked brick faces or spots where a whole brick pulled loose. A backlit box sign or a projecting blade sign might hide a full cut opening, so once it’s gone you can see raw block, old framing or exposed wall backing.

The damage also hides in less obvious places. Rust stains bleed from old steel anchors left in the wall. Sealant and adhesive pull away paint and the top layer of brick with them. Sometimes the sign covered years of weathering, so the patch area looks newer than everything around it. All of this shapes how the repair should go.

Assessing the Opening Before Brick Masonry Patching

A good patch starts with a close look, not a bag of mortar. Measure the opening first, both how wide it runs and how deep it goes. A shallow surface ding needs far less work than a hole that punches through to the backup wall. Check the brick around the edges too, since loose or cracked units near the gap have to come out before new brick goes in.

Before patching, a mason usually runs through a short list:

  • The size and depth of the opening
  • The condition of the surrounding brick
  • Whether the old mortar is soft, crumbling or still sound
  • If the sign sat near a lintel or another piece that holds weight above it

That last point matters most. Many storefront signs hang right over windows or doors, where a steel or brick lintel carries the load. If the opening reaches that support, someone needs to confirm it’s solid before closing things up. Older Fort Worth commercial guidelines lean toward keeping and repairing the original storefront materials, which makes this careful check even more worthwhile.

Matching Replacement Brick in Older Retail Facades

Filling a former sign opening drops new brick right into the middle of an old, weathered wall. That’s a tough spot to hide. Brick from decades ago rarely matches what’s sold today. Size is the first hurdle, because older brick often runs taller, shorter or thinner than modern units. Set a mismatched brick next to the original and the whole patch reads as a scar.

Color and texture come next. Old facades pick up soot, sun fading and a soft worn surface that fresh brick just doesn’t have. A dead-on factory color can still look wrong once it sits in daylight. Good masons hunt for salvaged brick from the same era, or they tumble and stain new brick to soften it. Orientation counts too, so the new brick should sit the same way the old ones do, with joints that line up across the patch. When the goal is to erase a former sign opening, these small choices decide whether the repair vanishes or draws the eye.

Rebuilding the Opening Without Creating New Masonry Stress

A patch has to move with the wall around it, not fight it. Brick walls expand and shrink a little with heat and cold, and a stiff repair jammed into a soft old wall tends to crack at the edges. To avoid that, masons tooth the new brick into the opening. They weave it into the existing courses instead of stacking a flat block inside the hole. This ties the patch to the wall so loads spread evenly.

Mortar choice plays a big role here. Masons usually laid old brick with soft lime mortar. Fill the gap with hard modern Portland mortar and the mismatch can crack the older brick as the wall shifts. A mortar close to the strength of the original keeps stress low. Fresh mortar should also match the color and joint style of the surrounding wall, so the repair blends instead of standing out. When it’s built right, the filled opening carries weight the same way the rest of the facade does.

Preserving the Character of Older Fort Worth Retail Buildings

Older storefronts tell you when they were built. The brick pattern, the sign band above the windows and the worn surface all carry that story. Yank down a sign and slap in a rough patch, and you chip away at that character. On a historic commercial block, that loss adds up fast across a street of similar buildings.

Fort Worth preservation guidance leans toward keeping historic signs where it can and repairing original facade features with care. Even when a sign has to come down, a thoughtful patch respects what the building was. Matching the brick, using compatible mortar and toothing the repair in cleanly all protect the look that gives these older retail buildings their pull. A wall that hides its former sign opening keeps the storefront honest to its age.

Frequently Asked Questions

Why can removing a commercial sign damage surrounding brick masonry?

Signs anchor into the wall with bolts and screws that grip the brick. Pulling them out rips away surface chunks and leaves drilled holes, cracked faces and loose bricks. Larger sign boxes can sit inside a cut opening, so taking them down exposes a bare backup wall.

How is an old sign opening prepared before brick masonry is patched?

A mason measures the width and depth, then checks the brick and mortar around the edges. He removes loose or damaged units and pulls out old rusted anchors. Cleaning the area back to sound material lets fresh brick and mortar bond well.

Can replacement bricks be matched to an older Fort Worth retail building?

Often yes, though it takes work. Salvaged brick from the same period gives the closest match for size, color and texture. When none turns up, masons tint or lightly age new brick and set it in the same orientation to blend the patch in.

Should a lintel be checked before patching a former sign opening?

Yes, especially when the sign sat above a window or door. A lintel carries the wall above that opening, so it has to stay sound. Confirming it’s solid before patching keeps the finished repair from settling or cracking later.

How can a patched sign opening blend with an older storefront facade?

Blending starts with matching brick, mortar and joints, then toothing the new brick into the old courses. Compatible mortar and careful color choices help the patch settle into the surface. Over time a well-built patch reads as part of the original wall.

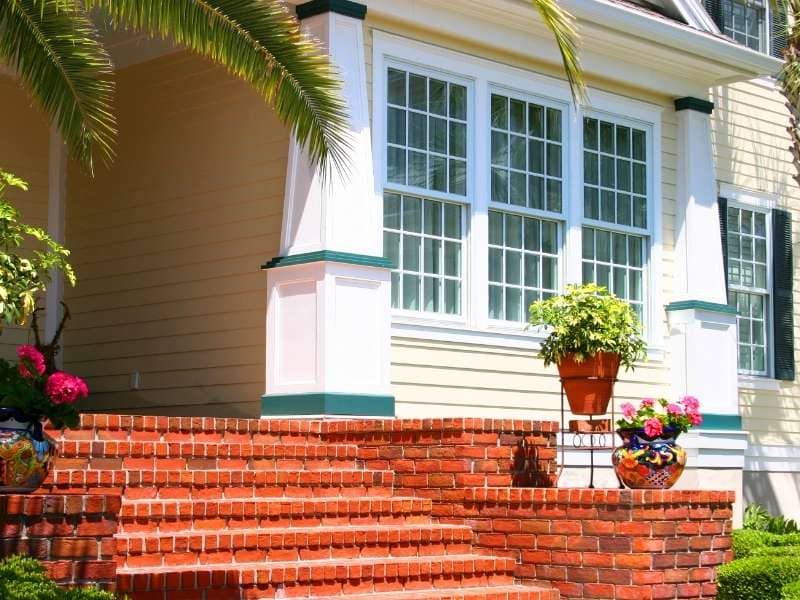
Brick Mason Work for Rebuilding Damaged Porch Columns

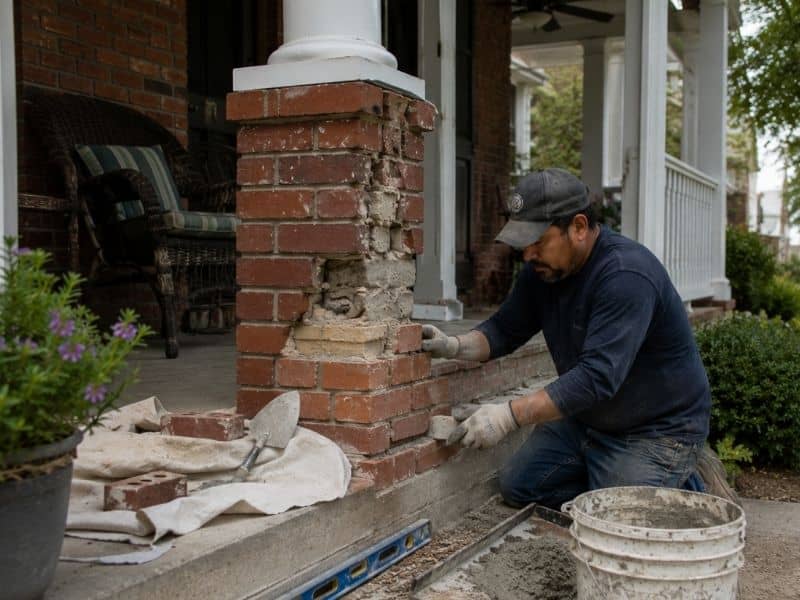
Brick mason rebuilding a damaged brick column on a traditional porch in Fort Worth, Texas.

Porch columns take a beating that most homeowners never think about. They hold up the roof, sit exposed to weather on every side and often get bumped by lawn equipment or ladders over the years. A lot of older homes still have their original brick columns, and a construction survey of these porches usually turns up the same story: cracked bricks in one section while the rest of the column looks fine. A brick mason does not treat every damaged column the same way. Some just need a patch. Others need a full rebuild. 

Assessing Damage in Existing Brick Columns

Before any repair work starts, a mason walks the column from top to bottom, checking a few specific things. Cracked or chipped bricks are the most obvious sign, but they are rarely the whole story. Mortar joints tell a lot too. Soft, crumbling mortar means water has been getting in for a while, and that weakens the bond holding everything together.

Leaning is the detail that gets the most attention. A column that tilts even slightly is often dealing with more than surface damage. It may point to a shifting foundation, a failed footing or years of gradual settling underneath the porch. A mason checks this with a level, not just a glance, because a lean that looks small from the yard can be a real problem up close. Once all of this gets mapped out, the decision about how much to rebuild starts to make sense.

When Brick Columns Need Partial Rebuilding

Not every damaged column needs to come down. If the trouble is limited to one section, say the base where water tends to splash and pool, a mason can often remove just that portion and rebuild it in place. This keeps the rest of the original column intact, which matters a lot on older Fort Worth homes where the brick has aged in a way that is hard to copy exactly.

Partial rebuilding works best when the damage has stayed contained. If cracks run the full height of the column, or if the top and bottom sections both show separate problems, patching one spot and leaving the rest is a short term fix at best. A mason has to judge whether the undamaged brick above and below the repair is still structurally sound enough to carry the column’s load once the new section goes in.

Matching Brick for Traditional Fort Worth Porches

Fort Worth has plenty of homes built decades ago, and the brick on those porches often does not match anything sold today. Older brick was fired differently, and the color, texture and even the exact size can be slightly off from modern batches. A mason working on a rebuild has to track down brick that comes close, whether that means sourcing reclaimed brick, finding a supplier who stocks older styles or hand selecting pieces that blend well next to the original.

Mortar color matters just as much as the brick itself. A rebuilt section with the right brick but the wrong mortar tone will still stand out from ten feet away. Getting both right, brick and mortar together, is what makes a rebuilt column disappear into the rest of the porch instead of announcing itself as new work.

Rebuilding Brick Columns for Proper Load Support

A porch column is not just decoration. It carries real weight from the roof above, so a rebuild has to hold up structurally, not just look right. Each course of brick needs to sit level, with joints staggered the way the original wall was built so the load spreads evenly through the column instead of concentrating in one weak line.

Alignment gets checked constantly during the rebuild, not just at the end. A column that drifts even a small amount off plumb while it is going up will keep drifting as more courses get added on top. Mortar needs time to cure properly between stages too, since rushing that step can leave joints weaker than they should be. None of this is visible once the work is finished, but it is the difference between a column that lasts another fifty years and one that starts cracking again within a few seasons.

Finishing Rebuilt Brick Columns to Match the Porch

Once the structural work is done, the last stretch of the job is about appearance. Mortar joints get tooled to match the style used on the rest of the porch, whether that is a concave joint, a flush finish or something rougher and older looking. Small details like this are easy to overlook, but they are usually what someone notices first when they look at the finished column.

Cleanup matters here too. Fresh mortar can leave a haze on brick if it is not cleaned off carefully, and that haze is stubborn once it dries. A mason wipes down the new work as it goes and does a final cleaning pass so the rebuilt section reads as part of the original porch, not a patch stuck onto it. On a historic home, this final step is what protects the character of the porch while quietly fixing what was actually broken underneath.

Frequently Asked Questions

When should damaged brick columns on a porch be rebuilt? 

Rebuilding often makes sense once there is significant cracking, loose or missing bricks, a visible lean or mortar that has deteriorated enough to weaken the joints. These signs suggest the column can no longer support the porch safely on its own.

Can a brick mason rebuild only part of a damaged porch column? 

Yes, when the damage stays limited to one section and the rest of the column is still structurally sound. If cracking or deterioration runs through most of the column, a more complete rebuild is usually the safer approach.

How can new brick match an older porch column? 

A mason looks for brick close in size, color and texture to the original, often through reclaimed materials or specialty suppliers. Matching the mortar color and joint style is just as important as matching the brick itself.

How long does rebuilding a brick porch column take?

Timelines vary based on how much damage there is, the size of the column, how easy it is to find matching brick and how long the mortar needs to cure between stages. A small partial rebuild moves faster than a full column replacement.

Can damaged brick columns affect the rest of a porch? 

Yes, especially since columns often carry structural weight from the roof. Damage should get looked at soon, particularly if there is any leaning or movement, since delays can let a contained problem spread further into the porch structure.

Why Brick Chimney Crowns Crack Before the Bricks Below Them

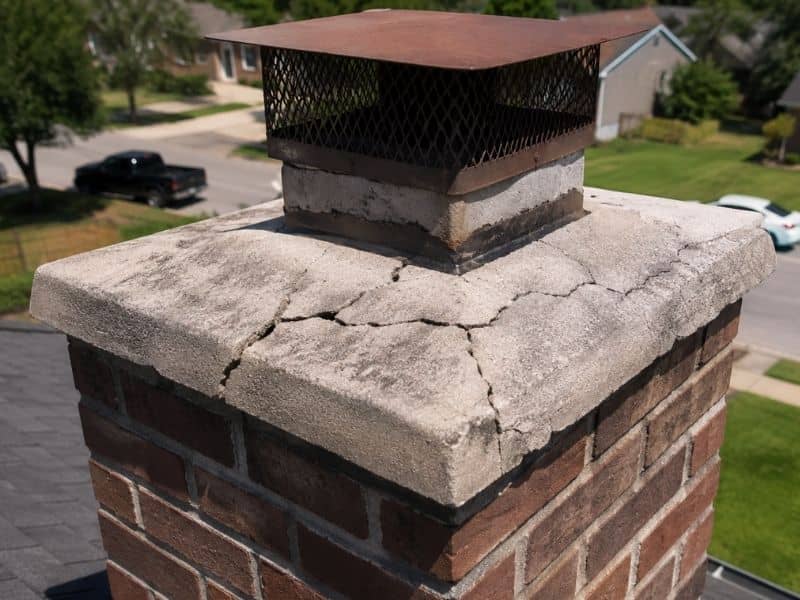
Cracked crown on a brick chimney showing weather damage and fractures on a Fort Worth home

If you own a home, you may have noticed your brick chimney does not age the same way all over. The crown, that flat cap sitting on top of the chimney, takes the worst of the sun, rain and cold air all year long. A construction survey of homes often finds the same thing again and again: a cracked crown sitting above brick that still looks solid. Why does this happen? The crown is not just a cap. It has the hardest job on the whole chimney, and it wears out faster than the brick underneath it.

Why the Chimney Crown Takes More Temperature Stress Than Brick

The crown sits at the very top of the chimney, with nothing above it but open sky. That spot gets full sun in the afternoon and then cools fast once the sun drops. Brick lower down the chimney does not deal with this kind of swing. It sits closer to the roof line, often shaded by trees or nearby structures, and it warms up and cools down at a slower pace.

Fort Worth adds its own twist to this problem. North Texas weather can jump from a hot, dry afternoon to a cold front within hours. That kind of quick shift makes the crown expand and shrink over and over. Concrete and mortar do not love rapid change. Over time, this constant push and pull opens tiny cracks in the surface. The brick below stays more stable simply because it is not exposed the same way.

How Freeze-and-Thaw Cycles Widen Small Crown Cracks

A hairline crack in a crown does not sound like a big deal, but water changes that fast. When rain or dew settles into a small crack, it stays there. If the temperature drops below freezing, that trapped water turns to ice and expands.

Ice takes up more space than liquid water, so it pushes against the sides of the crack. Once things warm back up, the ice melts and the crack is left a little bit wider than before. This happens again the next time it rains and freezes, then again after that. Fort Worth does not see freezing weather every week, but it happens enough times each winter for this cycle to matter. A crack that started as a thin line can turn into a wide gap over a few seasons without any single storm causing sudden damage.

Crown Cracks That Allow Water Into the Chimney Assembly

Not every crack lets water through in the same way. A short hairline crack running across the surface might shed most rain before it soaks in. A crack that runs toward the edge of the crown, or one that connects to the flue, is a different story. Water can travel along these paths and reach parts of the chimney that were never built to get wet.

The direction of the crack matters just as much as its length. A crack pointing toward the chimney’s center, near the flue liner, is more likely to let moisture into the structure than one running along the outer edge. This is one reason two crowns with similar looking cracks can behave in very different ways. Location and direction decide how much risk a crack really carries.

Signs a Cracked Chimney Crown Needs Masonry Attention

Some crown damage is easy to spot from the ground with a pair of binoculars. Look for these signs:

  • Cracks that have grown wider than a hairline
  • Sections of the crown that look separated or lifted at the edges
  • Crumbling or flaking along the crown’s surface
  • Chalky white marks near cracks, which can point to water moving through
  • Dark stains or damp patches around the top of the chimney after rain

None of these signs mean the brick itself has failed. They point to the crown specifically, since it is a separate piece built and finished on its own. Catching these clues early, before a crack turns into a missing chunk of concrete, makes a much smaller job for whoever ends up doing the repair.

How Crown Design and Drainage Help Limit Future Cracking

A well built crown does more than sit flat on top of the chimney. It should overhang the brick by about two inches on every side, with a slight slope so water runs off instead of sitting on the surface. That slope, called a wash, keeps rain moving away from the flue and off the crown’s face.

Drip edges under the overhang also matter. They stop water from running back under the crown and staining the brick below. In a place like Fort Worth, where hot summers and occasional freezes both show up in the same year, these small design details cut down how much water gets trapped and frozen in the first place. A crown built with the right slope, overhang and sealed surface will always hold up better against these swings than a flat, unfinished one.

Frequently Asked Questions

What causes a brick chimney crown to crack? 

Crown cracks usually come from a mix of temperature swings, moisture soaking into the surface and small amounts of material movement. Repeated exposure to sun, rain and cold air over the years slowly wears down the surface until small cracks appear.

Why does the chimney crown crack while the bricks remain intact? 

The crown and the brick below it are separate parts, built at different times and exposed to weather in different ways. The crown sits fully open to the sky, while the brick courses often get some shade and shelter, so each part moves and ages on its own schedule.

Can small chimney crown cracks get worse? 

Yes. Water can settle into a small crack and freeze during cold weather, and that ice expands and pushes the crack wider. Repeating this cycle season after season is often what turns a hairline crack into a larger one.

How do North Texas temperature swings affect chimney crowns? 

Fort Worth often sees fast changes between hot afternoons and cool fronts. This makes the crown expand and contract more often than a location with steady weather, which adds repeated stress to the surface over time.

When should a cracked chimney crown be inspected? 

A closer look makes sense once cracks start widening, edges begin crumbling, or you notice damp patches and staining near the top of the chimney after rain. These changes suggest the crown’s surface is breaking down and moisture may be getting past it.

Brick Repair Above Garage Openings Starts With the Crack Pattern

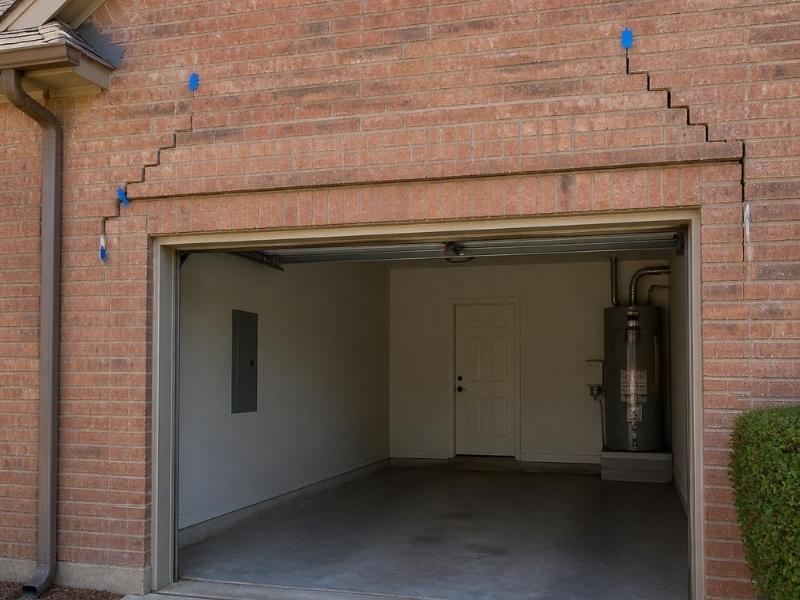
Stair-step cracks in brick masonry above a residential garage opening in Fort Worth, Texas.

A crack over the garage door looks small at first. Then it grows, and the brick starts to step or bulge. Good brick repair above a garage opening starts with one thing, and that is reading the crack. The shape and the spot tell you what went wrong. For developers working on Fort Worth homes, where clay soil swells and shrinks with the seasons and the garage is the widest hole in the wall, that spot cracks before anywhere else. Fill it too soon and it comes right back. Read it first, and you fix the real problem once.

Why the Brick Above a Garage Door Cracks First

The garage door is the widest opening in most walls. Brick cannot span that gap on its own. It rests on a beam called a lintel that carries the load across the top. All that weight funnels down to the two top corners of the opening. So when the wall moves, or the lintel gives, the stress lands right there. That is why cracks show up over the garage long before the rest of the wall says a word.

Read the Crack Pattern Before You Fix Anything

The crack is a clue, and its shape points to the cause. Look at where it starts, which way it runs, and whether the brick has moved.

  • Diagonal cracks from the top corners of the opening often mean the lintel is sagging or the steel behind it is rusting and swelling.
  • A flat crack along the lintel line, with the brick above pushed up or out, points to a rusting steel lintel as the rust swells and lifts the course.
  • Stair-step cracks climbing through the mortar from a corner usually mean the ground under the opening is moving.
  • A straight up-and-down crack over the middle of the opening can mean the lintel is too weak or barely resting on the wall at its ends.
  • Cracks that open in one season and close in another point to clay soil swelling when wet and shrinking when dry.

Snap a few photos over a couple of months. A crack that keeps growing is telling you the cause is still active.

The Two Things Usually Behind It

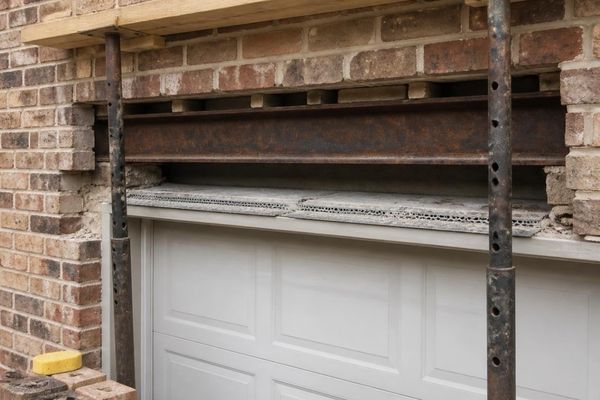
Rusted steel lintel exposed during brick repair above a residential garage door in Fort Worth, Texas.

Most cracks over a garage door trace back to a bad lintel or moving ground. Sorting out which one saves you from the wrong repair.

A steel lintel fails in a few ways. It can sag if it was too small or the span was too long. It can rust, and this is the sneaky one. Water gets past bad flashing or blocked weep holes, sits on the steel, and the steel rusts. Rust takes up far more room than the metal it came from, up to several times as much. That swelling steel pushes the brick up and out, and cracks the joints. The ends of the lintel also need enough wall to rest on. Too little, and it slips or sags.

Ground movement is the other cause. Clay soil holds water, swells up, then shrinks as it dries. That lifts and drops the foundation over the year. The garage opening is wide and weak, so it cracks first. This kind of movement needs a look at the foundation, not just the brick.

What to Do About It

Never just fill the crack and walk away. Find the cause and stop it first, or you will pay twice. Start with water, since water drives most lintel rust. Check the flashing above the lintel, clear the weep holes, and aim downspouts away from the wall. Then deal with the lintel itself. A rusted or sagging lintel needs to come out and get replaced with one sized right and set with enough bearing on each end. That job needs the brick above held up with temporary support while the old steel comes out. If the cause is ground movement, get the foundation checked before any brick work.

Wide garage spans carry a lot of weight. Anything over about twelve feet should be sized by a structural engineer, not guessed. Once the cause is fixed and the wall is stable, then you repoint the joints or replace the cracked brick to match.

One safety note. Loose, bulging, or dropping brick over an opening is a falling hazard. Keep people and cars clear, and call a mason or engineer. Do not knock 

brick out from over a door without proper support, because the whole course above can come down.

Frequently Asked Questions

Are cracks above my garage door serious?

They can be. A thin hairline may be simply settling. A crack that widens, steps, or comes with pushed-out or sagging brick usually means the lintel or the ground is moving. Get those looked at soon, since the brick above an opening can loosen and fall.

What makes the brick over a garage door crack in the first place?

Two causes lead the list. The steel beam over the door can rust and swell or sag under the load, which cracks the brick around it. The ground can also shift, since clay soil swells and shrinks with moisture and drops the widest part of the wall first.

Can I just caulk the crack or add new mortar?

Only after the cause is fixed. Sealing a crack while the lintel still rusts or the soil still moves just hides the problem for a few months. The crack returns, often wider. Stop the water or the movement first, then patch.

Why does the crack keep coming back after every repair?

Because the repair treated the crack and not the cause. If water still reaches the steel, or the foundation still lifts and drops, the same stress reopens the same crack. A lasting fix removes the source, whether that is a rusted lintel or a moving base.

Do I need an engineer or just a mason?

That comes down to the cause and the span. A mason can handle flashing, repointing, and many lintel swaps. Wide garage openings and any sign of foundation movement call for a structural engineer to size the beam or check the base before repairs.

Painted Brick With White Stains May Be Signaling Trapped Moisture

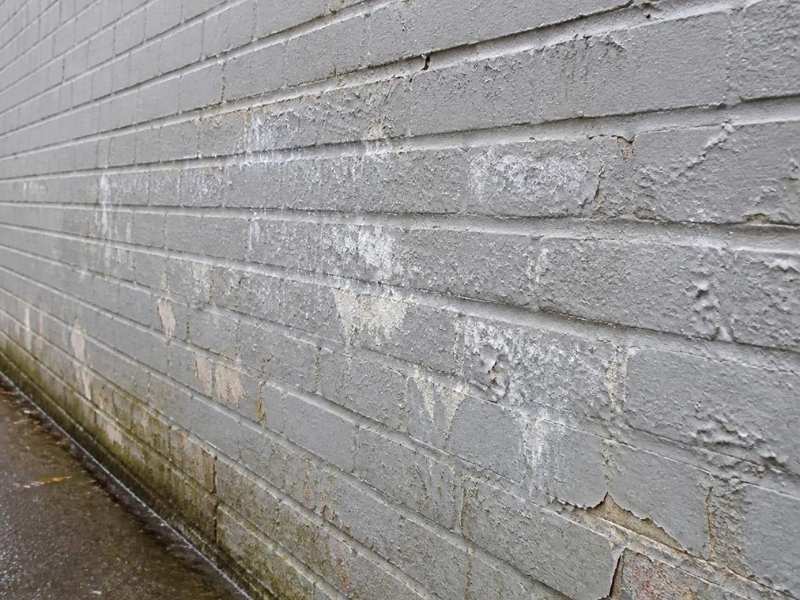
White moisture stains and peeling paint on an exterior brick wall in Fort Worth, Texas.

That chalky white haze on painted brick is easy to wipe at and forget. On a painted wall, it means more than dust. White stains on painted brick often show that water is stuck inside the wall with no way out. For developers working in homes and buildings, where painted and whitewashed brick is a popular look and the weather swings from wet spells to winter freezes, that trapped water can quietly damage the brick under the coat. Here is the short version. The stain is a symptom. The real problem sits behind the paint, and painting over it makes it worse.

What the White Stains Are Telling You

The white marks are salt left behind by water. Water moves through brick and mortar, picks up natural salts, and carries them toward the surface. As the water dries, the salt stays behind as a pale, powdery film. On bare brick you can often brush it off. On painted brick the story shifts. The paint blocks the surface, so the salt and the water get stuck, and the stain becomes a warning that the wall is not drying. If you see it come back again and again, the wall is holding water it cannot release.

Why Paint Changes Everything About Moisture

Brick was made to breathe. A raw brick wall soaks up some water and then lets it dry back out through its face. Many common paints seal that face shut. Water still finds ways in, from rain, from the ground, from leaks, or from humid air inside. Once it is in, a sealed face traps it. Breathable masonry coatings let vapor pass through, but standard latex and heavy elastomeric paints hold it back. So the paint that looks clean and fresh can turn the wall into a sponge with a lid on top.

The Damage You Cannot See Under the Coat

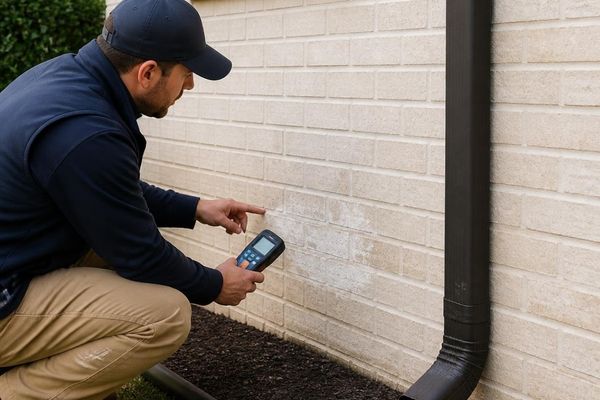
Mason checking white moisture stains on a painted brick exterior wall in Fort Worth, Texas.

Trapped water does its worst work out of sight. It sits in the brick, freezes on cold nights, expands, and pops small pieces off the face. That is called spalling. When the paint finally peels, chunks of brick face can peel with it. Vapor pressure also pushes the paint off from behind, which shows up as bubbles and blisters. Mortar joints soften and crumble as they stay damp. By the time the surface looks bad, the brick behind it may already be losing its face.

Watch for these signs on a painted brick wall:

  • Paint that bubbles, blisters, or peels in patches
  • White chalky stains that keep coming back after cleaning
  • A damp or musty smell near the wall
  • Mortar joints that feel soft or crumble when touched
  • Flaking paint that pulls bits of brick off with it

Find the Water Before You Touch the Paint

Fixing the paint first is a waste of money. Water has to be getting in from somewhere, and that source needs to go first. Check the roof, gutters, and downspouts for leaks or overflow that soak the wall. Look at the ground next to the brick. Soil and mulch piled high, or a slope tilting water toward the wall, both push moisture into the base. Watch where sprinklers spray, since a head that hits brick every morning keeps it wet. Inside, high humidity and poor airflow can drive vapor into the wall from behind. Track down the real source, fix it, and the wall gets a chance to dry.

What to Do About Painted Brick That Keeps Staining

Start by stopping the water, then give the wall time to dry fully before any new coating goes on. Do not paint over the stain to hide it, because a fresh coat seals the moisture in and speeds up the damage. Have a mason check the brick under the paint for spalling, soft spots, and failed mortar, since those need repair before anything else. If the paint is a sealing type and the wall stays wet, taking the paint off may be the only way to let the brick breathe again. Use gentle removal, not sandblasting, which chews up the brick face. On any building from before 1978, treat the old paint as possible lead paint and use safe removal steps. When you do repaint, pick a breathable masonry coating so the wall can dry through its face.

A quick word on timing. Wet brick will not hold new paint or repairs well, so plan this work for a dry stretch. Rushing a coating onto a damp wall just restarts the cycle.

Frequently Asked Questions

Does white staining always mean the brick is damaged?

Not always, but it is a signal you should not ignore. A light haze can be simple surface salt. Repeat stains on painted brick point to water that stays trapped, and that trapped water is what harms the brick and mortar over time. Have it checked before it spreads.

Can I just clean the stain off and repaint?

Cleaning removes the look, not the cause. If water is still getting in and the paint still seals the face, the stain returns and the brick keeps taking damage. Fix the water source, let the wall dry, and only then decide on a coating.

Is painted brick a bad idea in a wet or freezing climate?

It can be, if the wrong paint is used. Sealing paints trap water, and freezing water breaks brick from the inside. A breathable masonry coating lowers that risk by letting the wall dry, though no paint replaces good drainage and sound flashing.

How do I know if my paint is breathable?

Check the product type or the old records if you have them. Mineral and silicate masonry coatings are made to pass vapor. Standard latex and thick rubber-like elastomeric paints usually do not. A mason can also test how the wall handles water and tell you what is on it.

Should I strip all the paint off my brick?

Only if the wall stays wet and the paint is sealing it in. Stripping is slow, costly, and can harm brick if done roughly. Many walls do fine once the water source is fixed and a breathable coating goes on. Get a mason’s read before you commit.

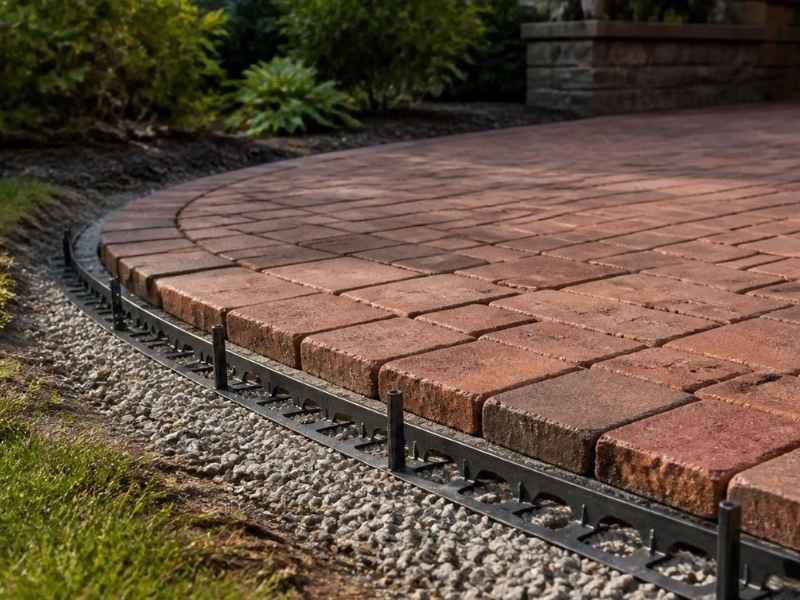
Brick Pavers for Driveways Need Edge Restraint Before the First Tire Rolls In

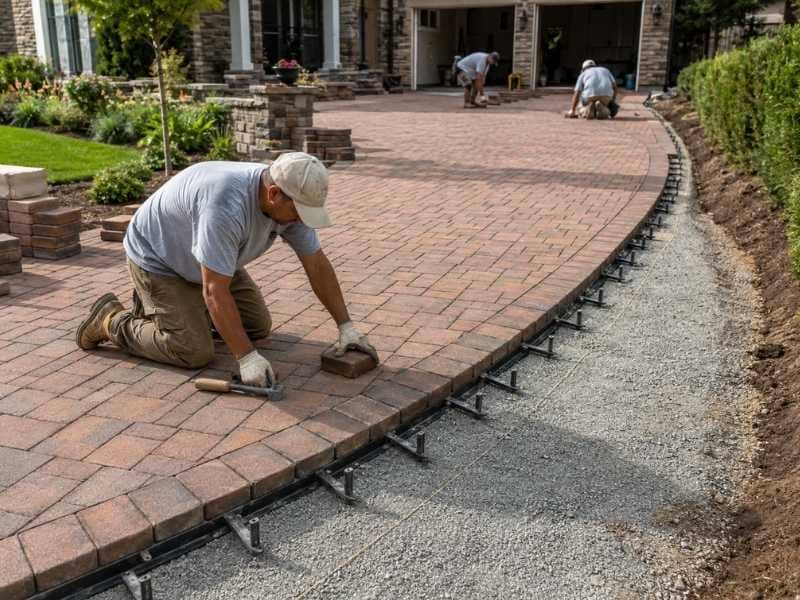
 Brick pavers for driveways showing anchored edge restraint along a curved driveway before vehicle traffic begins

A driveway takes more punishment than almost any other paved surface at a home. Brick pavers can handle that load for decades, but only when the edges get locked down before any weight rolls across them. Vehicles push pavers sideways every time a tire turns or stops. Without a firm edge holding the field together, that push slowly spreads the pavers apart until gaps and ruts show up. The work that goes into the border decides whether the middle stays tight for years or starts drifting after the first season.

Read Where the Tires Push Hardest

Not every part of a driveway feels the same force. Turning tires grind against the surface with a twisting motion that flat driving never creates. Braking near the garage sends weight forward into the same few rows again and again. Curves, the apron where the driveway meets the street, and the garage entrance all take extra strain.

These high-stress spots should guide how the base and the edges get built. A section that only sees straight, slow travel needs less reinforcement than a tight turn or a steep entry. Planning around the hardest-working zones puts the strongest support exactly where the driveway will try to fail first.

Treating the whole surface as equal wastes effort in calm areas and leaves the busy ones short. A mason who studies how cars actually move across the driveway can match the prep to the real pattern of wear. That kind of reading turns a generic install into one built for the way this driveway gets used.

Build the Base Past the Edge of the Pavers

The prepared foundation under a driveway has to reach beyond the pavers you can see. Borders and perimeter restraints need solid ground under them too, not soft fill that gives way. When the base stops right at the last visible paver, the outer row has nothing firm to lean on.

That unsupported strip becomes a weak seam. The center of the driveway can look flawless while the edges sink, tilt, or creep outward under repeated traffic. Once the border starts to move, the failure works its way inward toward the pavers that seemed fine.

Extending the compacted base under the full paved area, edges included, keeps the whole system sitting on stable ground. A base that runs a bit wider than the pavers gives the restraint something real to grip. That extra reach costs little during the dig and saves a major repair down the road.

Anchor the Perimeter Against Sideways Movement

Edge restraint exists to fight one specific thing, the horizontal shove a tire creates when it turns or halts. Without that anchor, pavers drift outward a fraction at a time until gaps open across the field. The restraint holds the outer pieces in line so the rest stay packed together.

Several details decide whether that restraint actually holds. The type of restraint matters, along with how deep it sits and how it connects to the ground. Curves and the driveway opening need extra attention, since those are the exact places where sideways force peaks. Spikes or anchors set too shallow pull loose over time and let the edge wander.

A restraint that’s secured well around the tricky spots keeps the perimeter honest for years. The connection between the restraint and the base is where many jobs quietly fail. Done right, the edge and the field act as one piece and share the load a driveway throws at them.

Fill the Joints So the Pavers Act as One

Joint sand does more than fill the gaps between bricks. When the paver joints are packed full, the pavers lock against each other and share load like a single surface. That shared strength is what lets a driveway carry a car without any one brick taking the full hit.

Trouble starts when the joints sit half empty. Incomplete filling, sand that washes out early, or traffic that rolls on before the joints are set can all break the connection. Once that happens, individual pavers rotate, separate, or slide under the weight of a tire, and the smooth surface starts to feel loose.

Filling every joint completely, then keeping vehicles off until the surface is ready, protects the interlock that makes the whole driveway work. Full joints also help keep water and grit from working down into the base. A tight, connected surface simply holds up better against everything a driveway faces.

Plan Sections You Can Lift for Future Repairs

Someday part of a driveway will need to come up. A utility line might need service, drainage might need a fix, or a settled spot might need to be reset. Installers who think ahead leave those areas easy to reopen instead of building one solid slab of interlocked brick.

Smart planning keeps a few habits in play. The paver pattern gets documented so a repair crew can put it back the same way. A handful of matching units get stored for later, since dye lots change and an exact match gets harder to find over time. Repair boundaries get chosen at natural break points, so a small section can lift out without disturbing large runs of the driveway. That foresight turns a future repair into a neat patch rather than a full tear-out that never quite matches again.

Frequently Asked Questions

Where does a brick paver driveway experience the most movement?

The heaviest movement shows up wherever tires twist or stop. Sharp turns, the garage approach, curved runs, and the apron at the street all take strong sideways force. Those areas shift first when the edges aren’t locked down, so they deserve the most support during the build.

Should edge restraint continue across a driveway entrance?

Yes. The entrance is one of the highest-stress points on the whole driveway, since tires cross it constantly and often turn there. Stopping the restraint short of the opening leaves the busiest edge free to spread. The anchor should carry through that transition, not quit before it.

How is driveway edge restraint secured around curved sections?

Curves need closer anchoring and careful placement, because the outward push builds up along the bend. Restraint on a curve usually calls for more frequent anchor points set at the right depth, plus tight connections that follow the shape of the arc. Loose or widely spaced anchors let the curve drift outward under traffic.

Why must the joints be completely filled before vehicles use the driveway?

Full joints are what tie the pavers into one connected surface. Until the sand fills every gap, each brick sits more or less on its own and can rock or slide under a tire. Driving on partly filled joints lets pavers shift out of place before the surface ever settles.

How soon can a vehicle drive over newly installed brick pavers?

That depends on the joint material and the install method, so the installer sets the timing. The core rule stays the same, wait until the joints are filled and set. Rolling weight onto fresh pavers too early can loosen the edges and knock the surface out of line before it stabilizes.

Brick Masonry Details That Help New Buildings Respect Established Streetscapes

Brick masonry details helping a new commercial building complement an established historic streetscape

Brick masonry plays an important role in how a new building fits within an established streetscape. The color, texture, brick size, bond pattern, and detailing around doors and windows all influence how the building relates to the surrounding neighborhood. In areas with a well-defined architectural character, these design decisions can help new construction complement nearby buildings while maintaining its own identity. Careful brick masonry detailing supports a cohesive streetscape and creates a transition between new development and the existing built environment. 

Start by Reading the Street You’re Building On

The most useful design research happens on foot. Walking the block reveals what the existing buildings actually share, and the pattern is often narrower than photographs suggest. One street may run heavily toward warm red brick with tight mortar joints, while the next favors buff tones and wider joints that make walls look softer from a distance.

Scale carries as much weight as color. Older commercial blocks often use a standard modular brick that gives walls a fine grain, so a large format brick on the same street can look coarse even in a matching color. Window proportions, storefront height and the rhythm of openings tell you how the buildings around you divide their facades. Noting all of this before selecting materials gives the design team a real reference instead of a guess, and it usually shortens design review with a planning department that cares about compatibility.

Details Do the Work Most People Notice

Broad choices set the direction, and the details decide whether a wall looks considered or careless. Bond pattern is the clearest example, since running bond, common bond and stack bond each produce a different surface even with identical brick. A common bond with header courses every sixth row reads as older and heavier, while stack bond reads modern and flat.

Mortar deserves more attention than it usually gets, because joints can occupy close to a fifth of a brick wall’s visible surface. A dark mortar makes each brick stand out and a light mortar softens the whole field, so the same brick can produce two very different walls. Joint profile matters too, and a concave joint casts a shadow line that a flush joint doesn’t. Corners, water tables, soldier courses over windows, brick arches and simple lintel treatments all give the eye something familiar to land on. These small moves cost little compared to the wall itself and they carry most of the visual result.

Modern Buildings Using Traditional Brick Well

Contemporary architecture and traditional masonry get along better than people assume, provided the building respects the scale of its neighbors. A clean, modern form clad in brick that matches the surrounding color range often sits comfortably on an older street, because the material and the proportions do the connecting while the form stays current.

Problems appear when a new building breaks the established rhythm rather than the style. A blank brick wall running seventy feet without an opening will feel wrong on a street of twenty five foot storefronts no matter how good the brick is. Dividing long facades into bays, holding a consistent floor height at the street, and keeping ground level windows generous all preserve the pattern people recognize. Designers can then push the upper floors, the roofline or the entry in a more modern direction without the building feeling out of place. That balance gives owners a project that reads as new construction while still belonging.

Making Brick Work With Other Exterior Materials

Few buildings today use brick alone. Stone bases, metal panels, wood soffits, stucco and large glass openings all appear alongside masonry, and the transitions between them decide whether the facade looks resolved. Changing material at an inside corner, a floor line or a structural bay looks intentional. Changing it in the middle of a flat wall rarely does.

Color relationships need a decision rather than a default. Warm brick pairs comfortably with bronze, warm gray stone and natural wood, while cool gray brick sits better next to black metal and cooler stone. Keeping the material palette to three or four elements prevents a facade from turning busy, which matters on a street where neighboring buildings use one or two. Detailing at the joints has to work in the rain as well as on paper, so flashing, sealant joints and drip edges belong in the drawings before construction. Sloppy transitions collect water and stain the brick below within a few seasons.

Durable Masonry Keeps Curb Appeal Working

Good design fades quickly when the wall performs poorly. Brick selected for the local freeze and thaw exposure, mortar mixed to the right strength for that brick, and flashing installed correctly at every shelf angle and opening will keep the facade looking close to new for decades. Mortar that’s harder than the brick around it causes the brick faces to spall instead of the joints wearing, which is a repair nobody wants to fund ten years in.

Workmanship shows itself over time. Consistent joint tooling, clean brick faces, straight coursing and properly functioning weep holes are the difference between a wall that ages gracefully and one that streaks. Owners considering long term value should treat these items as part of the design conversation rather than as field decisions. A street that keeps its character tends to hold property values well, and each new building either supports that or works against it. Brick chosen and detailed with care puts a project firmly on the supporting side.

How Weather Affects Brick Repair Projects Throughout the Year

Mason repairing mortar joints on an exterior brick wall during cool weather conditions in Fort Worth, TX.

Mortar doesn’t care about your schedule. Brick repair is a chemistry job disguised as a construction job, and the weather is one of the ingredients. Pour water and cement together on the wrong day and you get a joint that looks fine for a year and then crumbles. The fix is simple: pick your window before you pick your crew.

Mortar is wet chemistry, not glue

Mortar hardens through a reaction called hydration, and that reaction needs water and time. It doesn’t dry like paint. If the water leaves too fast or freezes before the reaction finishes, the mortar never reaches full strength. Professional brick masonry depends on proper curing conditions to create durable mortar joints that last for years. 

That’s the whole reason weather matters here. Every rule below traces back to one question: does the mortar keep the right amount of water long enough? Temperature, sun, wind and rain all push on that answer. Some push harder than you’d think.

The 40 degree line

Masonry specs treat 40 degrees Fahrenheit as the switch point. Below that ambient temperature, the industry standard (TMS 602, the masonry specification) calls for cold weather procedures. That means heated materials, protected work and covered walls for a set period after the work is done. Confirm the current edition and your local code adoption before you quote it.

Fresh mortar that freezes is the real danger. Water expands when it turns to ice, and that expansion breaks the young bonds inside the joint. The damage is invisible on day one and obvious in year three.

Cold weather work isn’t banned, it’s expensive

A good mason can work in the cold. They warm the sand, warm the mixing water and tent the wall with heat. All of that costs money and slows the crew down.

Ask for the cold weather plan in writing before you sign a winter contract. If the bid doesn’t mention heating or protection, the mason is planning to skip it. That’s a bid you should be suspicious of, not happy about.

Heat steals your water

Hot days do the opposite damage and get far less respect. Sun and dry air pull water out of the mortar before hydration finishes. The joint stiffens fast and looks set, but it’s weak inside.

The same masonry spec flags hot weather procedures above 100 degrees, and also above 90 degrees when wind speed passes 8 miles per hour. Wind is the part people miss. A breezy 92 degree afternoon can be harder on mortar than a still 100 degree one.

What a good crew does when it’s hot

They wet the brick before laying it, so the brick doesn’t drink the mortar dry. They shade the mixing area and the stockpile. They also work early and stop before the worst of the afternoon.

Watch for the shortcut: adding extra water to a stiffening batch. Retempering has limits, and a crew that keeps splashing the mud all day is weakening it. Ask about their cutoff time and their retempering rule.

Rain runs on a clock

Rain on a finished wall is fine. Rain on a wall that was pointed two hours ago is a problem. It washes cement out of the joint face and leaves a sandy, streaky surface that never gets hard.

Fresh work needs cover for a day or more, depending on temperature. A tarp is cheap. A rewash of the whole elevation is not.

Wet brick before repair causes a different headache. Saturated brick won’t take mortar well, and trapped water can push salts to the surface later. Most masons want the wall to dry out first, and rushing that is how you buy a white stain.

Season by season

Spring and fall are the good windows. Mild temperatures, moderate humidity and long enough days to work. Everyone knows this, which is why those calendars fill up first. Book early or take what’s left.

Summer work is fine with the right hours and the right prep. Winter work is fine with heat and protection. Both are doable, and both cost more per square foot than a April repair would have.

The bad windows are the swings. A day that hits 70 and drops to 28 overnight is worse than a steady cold week. Freeze-thaw cycling is what breaks masonry, and shoulder seasons in a mixed climate deliver plenty of it.

What to ask before you sign a weather-sensitive contract

  • What ambient temperature range does this bid assume?
  • If it’s below 40 degrees, what’s the heating and protection plan, and is it priced in?
  • If it’s above 90, what’s the daily cutoff time and the retempering rule?
  • How long will fresh joints be covered, and who supplies the cover?
  • What happens to the schedule if rain lands within 24 hours of pointing?
  • Is there a weather delay clause, and who eats the cost?

Run this list before the crew mobilizes. Every one of these questions is free right now. Each is a callback later.

Frequently Asked Questions

What is the best time of year for brick repair?

Spring and fall usually work best because temperatures are moderate and mortar cures at a steady pace. Summer and winter repairs are still possible with proper preparation and protection. The weather during the first 48 hours after the repair is often more important than the season itself.

Can brick repair be done in winter?

Yes. Brick repair can be completed during winter when proper cold-weather masonry practices are followed. Masons typically heat the mixing water and sand, then protect the finished work while the mortar cures. These extra precautions may increase both the cost and the project timeline.

Is it too hot to repair brick in summer?

Not necessarily, but high temperatures and strong winds can cause mortar to dry too quickly. Experienced masons reduce this risk by dampening the brick, protecting materials from direct sunlight, and adjusting work schedules during extreme heat.

How long does mortar need to stay dry after repair?

Fresh mortar should be protected from heavy rain for at least the first 24 hours and sometimes longer in cooler weather. Rain during the early curing period can weaken the mortar joints. Ask your mason how long the repaired area should remain covered.

Why do brick repairs fail after a year?

Improper curing is one of the most common causes. Mortar that freezes, dries too quickly, or becomes saturated with rain before it fully cures may never reach its intended strength. Over time, normal weather exposure and freeze-thaw cycles can cause those weakened joints to crack or deteriorate.

How Decorative Brick Walls Improve Front Yard Design

Decorative brick planter wall adding structure and curb appeal to a Fort Worth front yard landscape

Decorative brick walls can turn a plain front yard into something that actually looks intentional. Instead of grass running straight to the sidewalk, a low brick wall adds shape, structure, and a sense of permanence that most yards are missing.

Here is what a lot of homeowners overlook. A front yard without any defined edges tends to look flat, no matter how nice the landscaping is. A brick wall gives the eye something to rest on and ties the whole space together.

Decorative brick walls add structure, privacy, and curb appeal to a front yard, and they do it in a way that holds up for decades with almost no upkeep.

Why Brick Walls Change the Whole Feel of a Front Yard

A front yard without clear boundaries can feel open in a way that reads as unfinished rather than spacious. Adding a brick wall gives the space a defined edge, which makes the whole yard feel more designed and less like an afterthought.

Creating a Sense of Arrival

A low brick wall near the front walkway or property line signals where the private space begins. This small shift changes how a visitor experiences the approach to the house, giving the yard a clear starting point instead of one space blending into the next.

Adding Height Without Blocking the View

Unlike a tall privacy fence, a decorative brick wall can add visual interest at a lower height. This works well for homeowners who want structure in the yard without fully closing off the view from the street.

Popular Styles of Decorative Brick Walls

Not every brick wall needs to be a solid, uniform structure. Several styles work well for different yard layouts and home designs.

Low Border Walls Along Walkways

A short brick wall running alongside a front walkway adds definition without overwhelming the space. This style works especially well for smaller front yards where a taller wall would feel too heavy.

Brick Planter Walls

Brick walls built to double as raised planters combine structure with greenery. This style adds dimension to a flat yard and gives homeowners a defined space for flowers or shrubs without needing separate garden beds.

Accent Walls With Pattern Details

Some homeowners choose a brick pattern, like a herringbone or basketweave design, worked into a small accent wall near the entrance. This adds visual interest without requiring a large structure, and it works well as a focal point near a front door or mailbox area.

Seat Walls for Extra Function

A brick wall built at seat height serves two purposes at once. It defines the yard’s edge and gives people a place to sit during a gathering or while waiting at the front of the house.

How Brick Walls Add Privacy Without Full Enclosure

Many homeowners want some separation from the street without building a wall tall enough to block the whole yard from view. Decorative brick walls can strike that balance.

Partial Height Walls That Soften Street Noise

Even a wall two or three feet tall can reduce the feeling of being fully exposed to the street. It also helps soften some street noise, without requiring the homeowner to give up natural light or an open feel in the yard.

Combining Brick With Landscaping for More Coverage

Pairing a lower brick wall with shrubs or small trees behind it adds more privacy over time as the plants grow in. This combination gives homeowners more coverage without needing to build a taller, heavier wall from the start.

Why Brick Holds Up Better Than Other Yard Wall Materials

Wood fencing needs regular staining or replacement. Vinyl can crack in extreme heat. Brick handles both the sun and the occasional freeze that Fort Worth sees each winter without much trouble at all.

Low Maintenance Over Many Years

A brick wall does not need painting, staining, or yearly sealing. An occasional rinse to clear off dust and pollen is usually all it takes to keep it looking clean year after year.

Holding Color and Structure Through Weather Changes

Brick resists fading far better than painted wood or vinyl fencing. It also handles the swings between hot summers and occasional freezes without warping or cracking the way other materials can over time.

Design Choices That Affect How Long a Brick Wall Lasts

A decorative wall still needs the right construction details to stay solid for decades, not just to look good on day one.

A Proper Footing Below the Frost Line

Even a low decorative wall needs a solid footing set below the frost line for the area. Skipping this step risks shifting or cracking as the ground moves slightly through freeze and thaw cycles each winter.

Weep Holes for Drainage

Small gaps called weep holes, built into the base of a brick wall, let trapped water escape instead of building up behind the structure. Without them, water pressure can slowly push a wall out of alignment over time.

Matching Mortar to the Local Climate

The mortar mix used in a decorative wall needs to hold up to the specific temperature swings and moisture levels common in North Texas. Using the wrong mix can lead to cracking well before the wall reaches the end of its expected lifespan.

Questions to Ask Before Building a Decorative Brick Wall

A few clear questions before construction begins can prevent problems down the road.

  • Will the footing be set below the local frost line?
  • Does the design include weep holes for proper drainage?
  • What brick and mortar combination is recommended for this specific yard and climate?
  • Will the wall height and style match the overall look of the home’s exterior?

Getting clear answers before the project starts helps avoid a wall that needs repair or rebuilding within just a few years.

Frequently Asked Questions

How Do Decorative Brick Walls Improve Front Yard Curb Appeal?

Decorative brick walls add structure, definition, and visual interest to outdoor spaces. They create clear borders and design features that landscaping alone may not provide.

Can a Low Brick Wall Add Privacy to a Front Yard?

Yes. A low brick wall can create a greater sense of separation from the street while helping define the space. When combined with plants or landscaping, it can improve privacy and reduce outside distractions.

How Long Can a Decorative Brick Wall Last?

With proper construction, including a strong footing, quality mortar, and proper drainage, a decorative brick wall can last for decades with minimal maintenance.

Why Are Weep Holes Important in Brick Wall Construction?

Weep holes allow trapped moisture behind a brick wall to drain away. Without proper drainage, water buildup can weaken the wall structure and contribute to shifting or damage over time.

Are Decorative Brick Walls a Good Option for Small Front Yards?

Yes. Lower brick walls, planter walls, and landscape borders can add character and organization to smaller yards without making the space feel crowded or closed off.